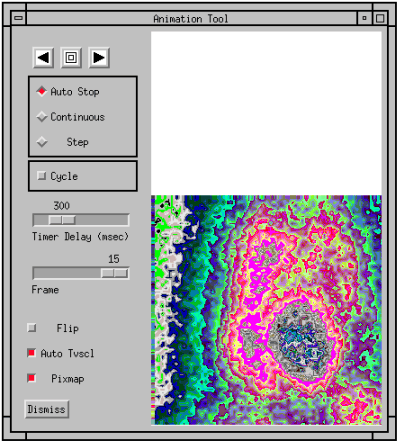
Createsa window for animating a sequence of images.
parent
Delay
Dims
Do_tvscl
0 Indicates that TV is used instead (no scaling).
Order
Pixmap
0 Specifies the data is stored in a variable.
Position
A two-element vector specifying the x- and y-coordinates of the upper-left corner of the AnimateTool window (long integer). The elements of the vector are [x, y], where x (horizontal) and y (vertical) are specified in pixels. These coordinates are measured from the upper-left corner of the screen.
A string containing the title that appears in the header of the AnimateTool window. Default value is "Animate Tool".
Background
Specifies the background color name.
Specifies the base color.
Specifies the name of the font used for text.
Specifies the foreground color name.
Using the WgAnimateTool window is similar in many ways to using the WgMovieTool window, but WgAnimateTool is intended to be used as a stand-alone utility widget, while WgMovieTool is designed so that it can be included inside larger layout widgets.
When reading the data from a file, the file containing the data must be a binary file containing the images in sequential order.
Figure 2-145 WgAnimateTool creates an interactive window that lets you use the mouse to control the orientation, pace, and direction of an animated series of images.
Figure 2-146 WgAnimateTool creates an interactive window that lets you use the mouse to control the orientation, pace, and direction of an animated series of images.
Step
to have the sequence Continuous
to have AnimateTool move through the images in a non-stop manner, pausing only when you click the Stop
button. Select Auto Stop
to have AnimateTool stop sequencing when it reaches either end of the data.
When enabled, the animation sequences repeatedly through the data, alternating between forward and reverse. When disabled, the animation returns to the first (or last) image in image_data after every image in the sequence has been displayed.
Decrease or increase the
The ordinal number of the currently displayed image is displayed above this slider. If you wish, use the left mouse button to drag the slider and display a different image.
When enabled, the first data value is used to draw the pixel in the upper-left corner of the image. When disabled, the first data value is used to draw the pixel in the lower-left corner of the image.
By determining whether the TV or TVSCL is used to draw the images, controls whether the input image data is automatically scaled to use the full range of available colors. Selecting this option may increase the contrast of the displayed images.
Auto Tvscl
does not affect the actual data; it only affects the display of the data. When enabled, the data is stored in pixmaps; when disabled, the data is taken directly from the variable.
Destroy the AnimateTool window and erase it from the screen.
parent
is defined, WgAnimateTool is created as a child of parent
; otherwise, WgAnimateTool runs on its own (i.e., in its own event loop).When you are finished interacting with the WgAnimateTool window, close it by clicking the
Dismiss
button.
PRO Sample_wganimatetool, parent, tool_shell heart = BYTARR(256, 256, 15)
IF !Version.platform EQ 'VMS' THEN $ OPENR, u, GETENV('WAVE_DIR')+$ '[data]heartbeat.dat', /Get_lun $ ENDIF ELSE BEGIN OPENR, u, !Dir+'/data/heartbeat.dat', /Get_lun ENDELSE READU, u, heart
CLOSE, u FREE_LUN, u
IF N_ELEMENTS(parent) NE 0 THEN BEGIN WgAnimateTool, heart, parent, tool_shell, $ /Do_tvscl, /Pixmap
ENDIF ELSE BEGIN WgAnimateTool, heart, /Do_tvscl, /Pixmap
ENDELSE END
For more information about how to transfer image data to variables, refer to Input and Output of Image Data in Chapter 8 of the PV-WAVE Programmer's Guide.
For more information about pixmaps, refer to Appendix , Output Devices and Window Systems.
For more information about color table indices, refer to Experimenting with Different Color Tables in Chapter 11 of the PV-WAVE User's Guide.
For more information about how to write an application program based on WAVE Widgets, refer to Chapter 5, Using WAVE Widgets, in the PV-WAVE GUI Application Developer's Guide. For more information about how to write an application program based the PV-WAVE Widget Toolbox, refer to Chapter 6, Using the Widget Toolbox, in the PV-WAVE GUI Application Developer's Guide.