Overview: Here is a little of what you will find on this page.
General Causes of Material Failures:
Improper and insufficient maintenance seems to be one of the most
contributing factors influenced by some improper designs such
as areas that are hard to inspect and maintain and the need for
better maintenance procedures. In many circumstances the true
load is difficult to predict resulting in a structure being stressed
beyond its normal capabilities and structural limitations. When
a structure is subject to cyclic loads, areas subject to fatigue
failure must be accurately identified. This is often very hard
to analyze, especially in a highly composite structure for which
analysis has a high degree of uncertainty. Thus, in general,
experimental structural fatigue testing is frequently resorted
to.
Recognition of Fatigue Failure
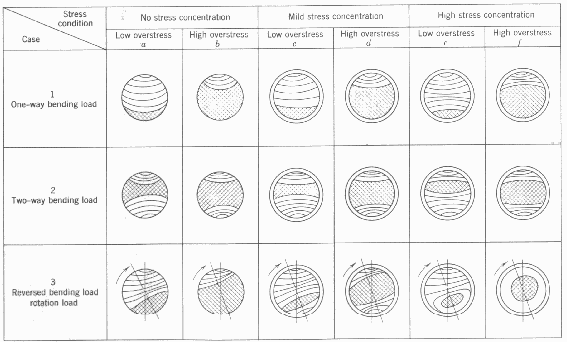
Two fatigue zones are evident when investigating a fracture surface
due to fatigue, the fatigue zone and the rupture zone. The fatigue
zone is the area of the crack propagation. The area of final
failure is called the rupture or instantaneous zone. In investigation
of a failed specimen, the rupture zone yields the ductility of
the material, the type of loading, and the direction of loading.
The relative size of the rupture zone compared with the fatigue
zone relates the degree of overstress applied to the structure.
The amount of overstressing can be determined from the fatigue
zone as follows: highly overstressed if the area of the fatigue
zone is very small compared with the area of the rupture zone;
medium overstress if the size or area of both zones are nearly
equal; low overstress if the area of rupture zone is very small.
Figure 1 describes these relations between the fatigue and rupture
zones.

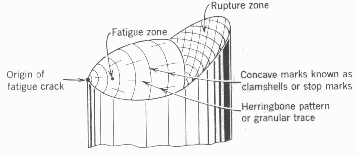
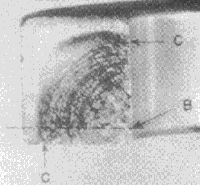
The fatigue zone can be described as follows: a smooth rubbed,
and velvety appearance, the presence of waves known as "clam-shells"
or "oyster-shells", "stop marks" and "beach
marks," and the herringbone pattern or granular trace which
shows the origin of the crack. In general, stop marks indicate
the variations in the rate of crack propagation due to variations
in stress amplitude in a cyclic application varying with time.
Figure 2 is a schematic representation of the fatigue zone.
Design Considerations
Even if careful attention to good design practices is constantly
the goal of design engineers, fatigue problems are sometimes introduced
into the structure. Fatigue failures are often the result of
geometrical or strain discontinuities, poor workmanship or improper
manufacture techniques, material defects, and the introduction
of residual stresses that may add to existing service stresses.
Typical factors affecting fatigue include the following: Stress
raisers, usually in the form of a notch or inclusion; most
fatigue fractures may be attributed to notch effects, inclusion
fatigue specimens are rare. High strength materials are much
more notch-sensitive than softer alloys. Corrosion is another
factor that affects fatigue. Corroded parts form pits that act
like notches. Corrosion also reduces the amount of material which
effectively reduces the strength and increases the actual stress.
Decarburization, the loss of carbon from the surface of the material,
is the next factor. Due to bending and torsion, stresses are
highest at the surface; decarburization weakens the surface by
making it softer. Finally, residual stresses which add to the
design stress; the combined effect may easily exceed the limit
stress as imposed in the initial design.
Influence of Processing and Metallurgical Factors on Fatigue
A myriad of factors affect the behavior of a material under fatigue
loading. Obvious factors include the sign, magnitude, and frequency
of loading, the geometry and material strength level of the structure
and the ambient service temperature. However, processing and
metallurgical factors are not often considered, but these factors
determine the homogeneity of materials, the sign and distribution
of residual stresses, and the surface finish. Thus, processing
and metallurgical factors have an overriding influence on the
performance of a structure.
Processing Factors
Stresses are normally highest at the surface of a structure, so
it follows that fatigue usually initiates at the surface. Stress
raisers are more likely to be present as a result of surface irregularities
introduced by the design of the structure or produced in service
or resulting from processing. Processing factors can introduce
a detrimental or beneficial effect into a structure, usually in
the form of effect on strength level or residual stress condition
of the surface material. Therefore, the effect of processing
on the mechanical properties of a material, especially the surface
of the material, directly affects fatigue properties. Processing
factors that influence the fatigue life of a structure include
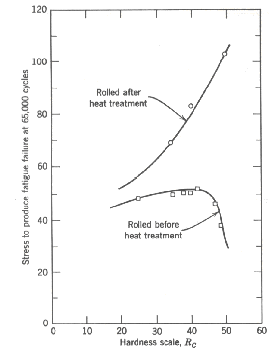
the following: the process by which a part is formed, such as
die casting; the heat treatment of a material, such as quenching,
which builds up residual stresses and annealing, which relieves
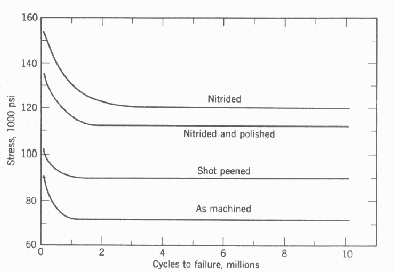
internal stress (see Figure 3); case hardening, such as carburization
or nitriding, which increases surface hardness and strength (see
Figure 4); surface finish, such as polished smooth by electropolishing;
cold working, which increases strength; also, cladding, plating,
chemical conversion coatings, and anodizing.
Metallurgical factors refers to areas within the material, wither
on the surface or in the core, which adversely affect fatigue
properties. These areas may arise from melting practices or primary
or secondary working of the material or may be characteristic
of a particular alloy system. In virtually all instances the
detriment to fatigue properties results from a local stress-raising
effect. Therefore, metallurgical factors affecting fatigue include
the following: surface defects, sub-surface and core defects,
inhomogeneity, anisotropy, improper heat treatment, localized
overheating, corrosion fatigue, and fretting corrosion.
Fatigue Life Curves
Failure due to repeated loading is known as fatigue. A small
crack, a scratch, or some other such minor defect causes localized
deformation. This deformation leads to a small crack if one was
not initially present. After cyclic loading, that is, loading
in the same way multiple times, the crack grows, and eventually
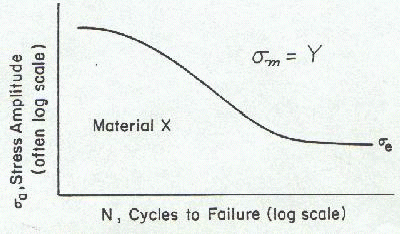
the material fails. A fatigue life curve is a graphical representation
of the cyclic loading. Simply, a fatigue life curve, also known
as an S-N curve is a plot of the stress amplitude versus the number
of cycles the material goes through before it fails. That is,
for a certain stress, the material will fail within a certain
number of cycles. Figure 5 is an example of a typical fatigue
life curve.
To help understand the concept of fatigue life curves, an experiment
that may be performed easily by anyone is presented here.
Fatigue Life Curves Experiment
What you need:
What to do:

An example of this experiment:
If an engineering component contains a crack, and if a cyclic
or repeated load is applied, the crack is likely to grow slowly
with increasing number of load cycles. This process is known
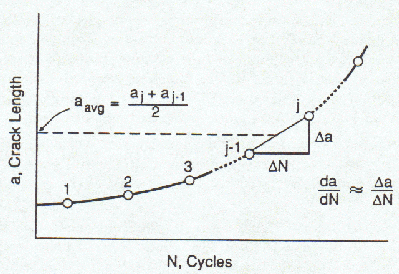
as fatigue crack growth. In a fatigue crack growth experiment,
the progress of a crack growing under a cyclic load is measured,
and the results are plotted as a fatigue crack growth rate curve,
da/dN versus K (that is, change in crack length divided by change
in number of cycles to failure versus change in fracture toughness).
A typical fatigue crack growth curve is shown in Figure 7.
In the simplest form of a fatigue crack growth rate test,
a cyclic load is applied that has fixed maximum and minimum loading
levels. The test specimen is usually a plate of material in which
a crack has already been started at the end of a V-bottom machined
slot. In a typical fatigue crack growth experiment, the sample
is loaded in a closed-loop servohydraulic testing machine and
data for crack length, number of cycles to failure, and fracture
toughness is recorded. From this data the mechanical behavior
for a certain material can be described under fatigue crack growth
loading by the fatigue crack growth rate curve. This sort of
experiment is useful for materials that would undergo high cyclic
loading stresses such as an airplane wing or a helicopter rotor.
Low Cycle Fatigue
Low cycle fatigue is the repeated cyclic loadings that cause significant
plastic deformation in a material and may cause fatigue cracking
after a relatively small number of cycles-hundreds or thousands.
Low cycle fatigue typically occurs as a result of repeated localized
yielding near stress raisers, such as holes, fillets, and notches,
despite the elastic deformation occurring over the bulk of the
component. Uniaxial testing is performed on several smooth (unnotched)
specimens under different cyclic deformation levels in a typical
low cycle fatigue test. Each specimen follows a given constant
stress amplitude, completely reversed, cyclic strain. That is,
the mode of testing is strain control instead of stress control.
Stress response is monitored during cyclic loading, and the number
of cycles to failure is recorded for these tests. The results
from several tests are necessary to determine the cyclic stress-strain
curve and the strain life curve for the material. A schematic
representation of a completely reversed controlled strain test
is shown in Figure 8.
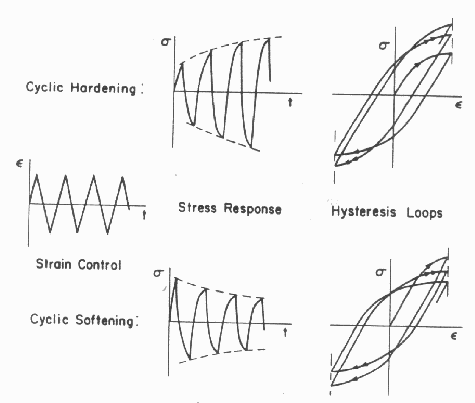
If a sufficiently high strain level is reached, yielding may occur
before the maximum strain is reached on each cycle of loading.
Stress amplitude usually varies; if it increases, the material
is said to cyclically harden, if it decreases, the material is
said to cyclically soften. However, this behavior tends to stabilize
such that the variation in the stress amplitude is small after
an initial period of transient hardening or softening. Once the
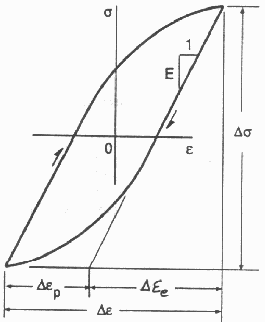
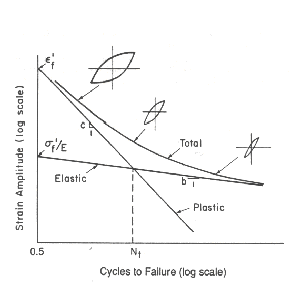
behavior is stabilized, a closed stress-strain hysteresis loop
is formed during each strain cycle. This hysteresis loop typically
looks like Figure 9. The area inside the hysteresis loop is the
energy absorbed per unit volume of the material. This energy
mostly dissipates as heat. Fatigue failure results under repeated
cycling and the life is measured by the number of strain cycles
to failure. A strain life curve may be plotted from the data
contained in the hysteresis loop as is shown in Figure 10. This
sort of experiment is useful in analysis of parts where the material
is strong enough to withstand the cyclic loading it may go through,
but fails due to fracture at a bolt hole or other such stress
raiser. An example of this is a structural member bolted to another
structural member which fails due to a crack originating from
the bolt hole.
The following describes a relationship between factors that shape
the S-N curves as they are influenced by design and manufacturing
conditions and the effects of such conditions on the fatigue properties
of materials, components, and structures.
Recommendations for Designs to Avoid Fatigue Failures
A designer can help to minimize the possibility of fatigue failure
by proper design of structural components. Many fatigue failures
may be attributed to lack of sufficient consideration of design
details or a lack of appreciation of engineering principles.
These principles, which are an integral part of good design of
structures subject to fatigue are well reported in literature,
but this information has been scattered throughout sources and
may be inaccessible to a designer who needs to understand and
utilize the principles. It is good design practice to seek out
sources of this information and to utilize the principles before,
during and after the design process.
Fatigue Considerations in Helicopter Design and Service
The helicopter is subject to many fatigue considerations that
fixed wing aircraft are not, such as the significant oscillatory
loads due to the harmonic content of aerodynamic loads from the
combined rotational and translation blade motion through the air,
also the cyclic loading of the rotor start-stop cycles, transient
maneuver loads, gust loads, coriolis loads, and torque loads.
These are just a small example of the many unique fatigue loading
considerations in helicopter design. Thus one may realize the
complexity of helicopter design and service. The helicopter is
one of many vehicles and structures which undergo unique fatigue
loading, therefore, fatigue considerations are an important part
of the design process.
Summary
In summary, fatigue plays an important role in all areas of the
engineering process, from design to manufacture to service during
the life of a product or structure. All engineers must carefully
study the effects and the many types of fatigue, no matter what
field of engineering and what part of the engineering process.
References
Metal Fatigue: Theory and Design. ed. A.F. Madayag, John
Wiley & Sons, Inc., 1969.
Materials Science and Engineering, An Introduction. 3rd
Edition, William D. Callister, Jr., John Wiley & Sons, Inc.,
1994.
Mechanical Behavior of Materials Laboratory. N.E. Dowling and R.A. Simonds, University Printing Service, 1995.
Submitted by Chris Meyer
Virginia Tech Materials Science and Engineering
http://www.eng.vt.edu/eng/materials/classes/MSE2094_NoteBook/97ClassProj/exper/meyer/www/meyer.html
Last updated: 5/6/97