One of the most important and key concepts in the entire field of Materials Science and Engineering is fracture. In its simplest form, fracture can be described as a single body being separated into pieces by an imposed stress. For engineering materials there are only two possible modes of fracture, ductile and brittle. In general, the main difference between brittle and ductile fracture can be attributed to the amount of
plastic deformation
that the material undergoes before fracture occurs. Ductile materials demonstrate large amounts of plastic deformation while brittle materials show little or no plastic deformation before fracture. Figure 1 (below), a tensile stress-strain curve, represents the degree of plastic deformation exhibited by both brittle and ductile materials before fracture.

Crack initiation and propagation are essential to fracture. The manner through which the crack propagates through the material gives great insight into the mode of fracture. In ductile materials
(ductile fracture),
the crack moves slowly and is accompanied by a large amount of plastic deformation. The crack will usually not extend unless an increased
stress is applied. On the other hand, in dealing with
brittle fracture,
cracks spread very rapidly with little or no plastic deformation. The cracks that propagate in a brittle material will continue to grow and increase in magnitude once they are initiated. Another important mannerism of crack propagation is the way in which the advancing crack travels through the material. A crack that passes through the grains within the material is undergoing
transgranular fracture.
However, a crack that propagates along the grain boundaries is termed an
intergranular fracture.
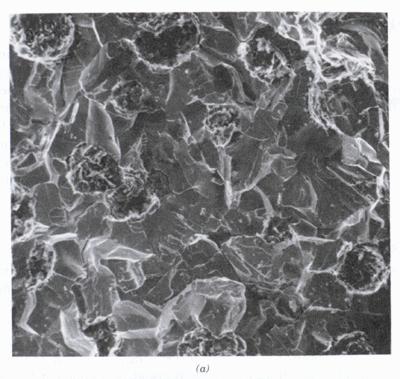
Figure 2 (below) shows a scanning electron fractograph of ductile cast iron, examining a transgranular fracture surface.

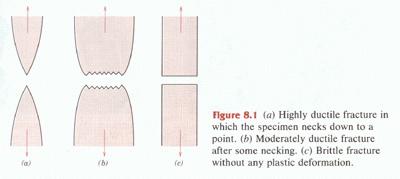
On both macroscopic and microscopic levels, ductile fracture surfaces have distinct features. Macroscopically, ductile fracture surfaces have larger necking regions and an overall rougher appearance than a brittle fracture surface. Figure 3 (below) shows the macroscopic differences between two ductile specimens(a,b) and the brittle specimen (c).

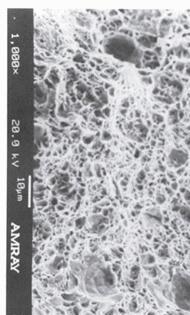
On the microscopic level, ductile fracture surfaces also appear rough and irregular. The surface consists of many microvoids and dimples. Figure 4 (below left) and Figure 5 (below right) demonstrate the microscopic qualities of ductile fracture surfaces.


The failure of many ductile materials can be attributed to cup and cone fracture. This form of ductile fracture occurs in stages that initiate after necking begins. First, small microvoids form in the interior of the material. Next, deformation continues and the microvoids enlarge to form a crack. The crack continues to grow and it spreads laterally towards the edges of the specimen. Finally, crack propagation is rapid along a surface that makes about a 45 degree angle with the tensile stress axis. The new fracture surface has a very irregular appearance. The final shearing of the specimen produces a cup type shape on one fracture surface and a cone shape on the adjacent connecting fracture surface, hence the name, cup and cone fracture. Figure 6 (below) shows cup and cone, and brittle fracture in aluminum.

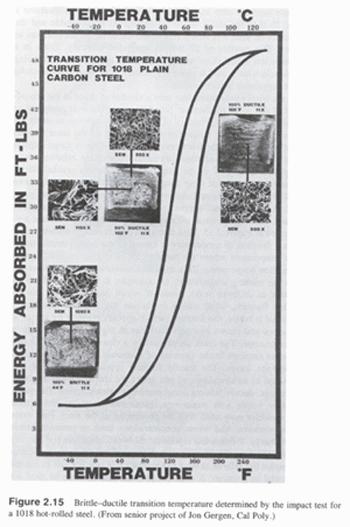
The Charpy and Izod tests measure the impact energy of a specimen. By using an apparatus and impacting a specimen with a weighted pendulum hammer the impact energy can be measured. A primary use of the Charpy and Izod tests is to determine if a material experiences brittle to ductile transition with decreasing temperature. Brittle to ductile transition is directly related to the temperature dependency of the impact energy absorbed. Also an examination of the failure surface can prove very beneficial. If a section of the failure surface seems to demonstrate the visual properties of both brittle and ductile fracture, then brittle to ductile transition is evident at that temperature range. It is very important to remember that with most specimens, there is a fairly wide band of temperatures that support brittle to ductile transition. Therefore, for many specimens it is nearly impossible to predict any one temperature as the transition temperature. In figure 7 (below), a graph is given that determines brittle to ductile transition through an impact test for a 1018 hot-rolled steel.

Submitted by David Bailey
Virginia Tech Materials Science and Engineering
http://www.eng.vt.edu/eng/materials/classes/MSE2094_NoteBook/97ClassProj/exper/bailey/www/bailey.html
Last updated: 4/25/97