ESM4714
Scientific Visual Data Analysis and Multimedia
Exercise #4:
Details of File Transfer in the SciViz and Multimedia labs
Motivation:
Because transferring files from remote supercomputers and/or UNIX workstations to
Mac and PC computers has been a key issue for many of our users over the last six
years we have included this special (long) exercise to go into more detail and
options available to the lab users. We have found that these file transfers
operations occur almost always from remote supercomputers and/or UNIX
workstations to Macs and PCs. This is partially why we have organized the class
chronologically in two parts: first SciViz where we generate large data set at
remote supercomputers and than generate images of this data on UNIX workstations
that means something to the engineer/scientist, and than finally to transfer and
organize these images into multimedia presentation on the more common Mac and PC
computers. Randomly picking images from a clip art CD-ROM is a poor substitute
for modeling, simulating, and visualizing the phenomena on remote super computers
and UNIX workstations. It is doubtful that the engineer/scientist will find the
correct CD-ROM image for a particular application. Therefore we emphasize that
images should be generated within the context of the application by the
engineer/scientist. In this class we attempt to link the two worlds of
visualization and multimedia by emphasizing the use of distributed resources over
the network. "Mainframe-centralized" computing under one roof is dead, long live
distributed computing.
Objective:
Transfer images of various physical phenomena created on UNIX
workstations to the Mac which is where we create QuickTime movies that will play on Macs
and PC-Window computers. These same animations can then be distributed to a much
wider audience with Mosaic or other web browsers. Although there are more convenient file transfer
software applications like "Fetch", here we introduce you to NCSA's Telnet.
Because the SciViz and Multimedia labs are connected to a common "Gator box" it
is even more convenient to use the chooser on the Macs and select the appropriate
UNIX hard disk (viz1, viz2, viz5, viz9, viz10, or mercury -> pluto) and just drag
and drop the
files from one machine to the other. We believe Telnet should not be used just
because it is the best known public domain application with the widest
distribution, but because the internet commands that are used on UNIX operating
system are also used by Telnet on the Mac and PC. In this exercise we will
introduce you to all these file transfer software tools but with NCSA Telnet we
can show you the essential concepts of internet and ftp commands that will work
anywhere across the network. Ironically we encourage you to use applications
like Fetch and the Gator box and abandon Telnet but only after you learn how to
use the more basic network file transfer commands. The same can be said of the
"vi" UNIX editor: it is not the editor of choice but everyone knows how to use
it: "Wherever you go there it is"
Procedures: NOTE: Highlighted italic text denotes user response.
A. Transferring files UNIX<->Mac using a Gator Box
Transferring files using the Macintosh chooser is made possible by a Gator Box
located in the Multimedia Lab.
Unfortunately, when you are working on a UNIX machine, you do not have a choice
of file transfer packages. You must use ftp commands on our UNIX system. But,
when you are working on a Macintosh or a PC you have a few choices of file
transfer packages.
If you are transferring files between two Macintosh machines, the easiest way to
transfer files is to mount the remote Mac's hard-disk on your Mac only if the
remote Mac is setup for file sharing. Follow the procedure below to mount the
remote machines drive.
- From the Apple Menu, chose, the Chooser option, and the menu below should appear.
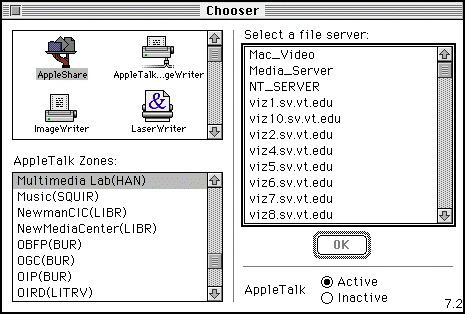
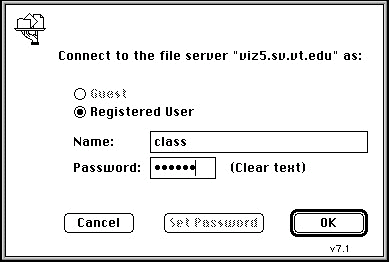
When you select the AppleShare option, the list on the right appears. From here,
you can change the Apple Talk Zone and chose a file server. After choosing a
file server, the figure below appears. In the case shown below, the file server
that we have chosen is a UNIX machine, but the ability to mount such machines on
a Macintosh rarely exists. In fact, the machines in the SciViz are the only
machines on campus which can be mounted in this manner. This has been
accomplished through the use of a Gator Box hardware that was made available to
us in the Multimedia Lab.
- Here, you must supply a valid user name and password. Press the 'tab' key to
move between fields. After supplying the correct information, a third menu
appears, shown below.
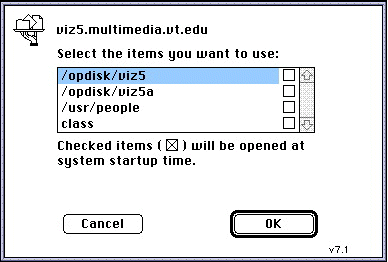
- Now, you can finally chose which drive you wish to mount. If you select
multiple drives (hold the shift key and click), each selected drive will appear
as an icon on your Mac desktop. Do not select the boxes, if you do, it will
create problems when the Mac has to be restarted.
- Now just drag and drop files from the Mac to the UNIX or UNIX to the Mac
hard-disk-drives. This is obviously the simplest of all the file transferring
methods in this exercise.
B. Transferring files without a Gator Box
If you need to move files between a Macintosh and a UNIX workstation that is
located outside of the SciViz Lab, you must follow the procedure shown below.
Briefly:
- Using the Apple Menu, choose Applications, then Telnet (NCSA Telnet). The
only thing that will happen is that the menu bar will change. So from the file
menu, choose Open and the following menu will appear. Here I am logging onto my
workstation in my office: www.esm.vt.edu.
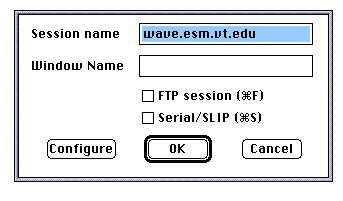
- You must supply the Session name. This is the machine name of the machine which
you wish to connect to. In this field, you can also input the IP number of the
machine that you wish. If you are ftp'ing you should also check the FTP session
box. Doing this avoids having to telnet to the machine and then ftp'ing back.
- If you are ftp'ing to the machine, once you are connected, you must issue the ftp
'user' command. This will prompt you for your username and password. If you
forget to give the 'user' command, it will prompt you to issue it when you
attempt to issue any other command. The only disadvantage of ftp'ing in this
manner is that you do not get any command prompts at all.
- If you desire to see the command prompts, using NCSA Telnet you can telnet to the
desired machine and then ftp back. But, you must keep straight where you are at,
because now the remote machine is the machine that you are sitting in front of
and you must issuer all "get" and "put" commands in reverse. This can get quite
confusing at times, especially for novice users.
Next we will expand on the procedure above which will show you how to
File Transfer Mac <-> UNIX Using Basic Commands without using the Gator box
- On the appropriate Macintosh in the Multimedia lab go to the folder
where you want to transfer the files and check to see if that file already
exists. If it does remove it or change it's name.
- Return to the hard disk on the Macintosh computer.
- Open the "communications" folder and then double-click on Telnet_2.5. (or
select Telnet_2.5 from "Applications" under the apple on the main menu)
- Select "open connection" under "File" of the main menu.
- Enter the appropriate IP address number (128.173.___.___) or
IP name (viz5.sv.vt.edu or mars.smvc.vt.edu for example)
for the "Session name" and select "FTP Session",
and then select "Enter" or "Connect".
- NOTE: You could at this point NOT select "FTP session" and just use telnet
- instead but you will not be able to ftp files from the UNIX workstation
- back to the Mac. Here we want to show you how to "get" or "put" files (get
- or put are ftp commands) from a Mac to a UNIX workstation.
- A window appears where you are prompted to logon:
- 220 viz? FTP server (UNIX(r) System V Release 4.0) ready
- user "user-name"
- Password required for "user-name"
- user-password (NOTE: ftp and telnet logons are very different)
-
- ls -lag (lists files in the home directory)
- Change to directory on the UNIX workstation where the brown.hdf file exists.
- cd /opdisk or optical/ESM4714/examples/brown/make_hdf (assuming an optical disk has been mounted)
- You can also change to a directory on the "local" Mac computer by using the
local change directory command "lcd". Go to the folder on the Mac were you want
to transfer the file(s) and send them to that folder, but first initiate the
binary command.
- binary
- lcd /"Mac hard disk name"/SciViz Tools/SpyGlass Tools/Dicer
- put "filename"
- lls (this verifies the file has been transferred to the localMac computer)
NOTE: It is sometimes confusing when using the ftp get or put commands. The
easiest way to remember which one to use is to keep your reference on the "local"machine. The local computer is the computer that started the ftp session, so
to list files of change directories use the "l" prefix in front of the ftp
command: lls -> lists files on the local machine and lcd -> changes directories
on the local machine. Similarly you "get" files from the remote machine and
"put" files on the remote machine where reference point is again the local
machine. Using tools such as fetch on the Macs makes this less confusing.
BASIC FTP COMMANDS:
- ftp> account (acc)
- ftp> ascii (asc)
- ftp> binary (bin)
- ftp> bye disconnect quit
- ftp> cd ()
- ftp> delete (del)
- ftp> dir (ls)
- ftp> disconnet ()
- ftp> get
- ftp> hash
- ftp> help (?)
- ftp> lcd
- ftp> ls
- ftp> lls
- ftp> mdelete
- ftp> mget
- ftp> mkdir
- ftp> mput
- ftp> open
- ftp> put or send
- ftp> pwd
- ftp> quit
- ftp> rmdir
- ftp> send
- ftp> user
- When all files have been transferred exit ftp.
- quit
- Go to the file menu bar and quit the application. Now you are ready to use
any of the Macintosh visual tools, see Exercise#6.
- Next we will show you how to use more convenient file transfer software
tools such as Fetch and mounting remote UNIX hard disks onto the Mac using Mac's
Chooser. But before we introduce you to those tools, we provide a short
description of the most commonly used ftp commands where the command abbreviationis shown in parenthesis if it exists.
C. Transferring files using Fetch
If you working on a Macintosh that has Fetch software installed, you can
transfer files between a Macintosh and UNIX machine using Fetch, a point and click interface.
- To start Fetch, From the Apple Menu, choose Applications, then Fetch. You will see on the monitor a menu, similar to the one shown below.
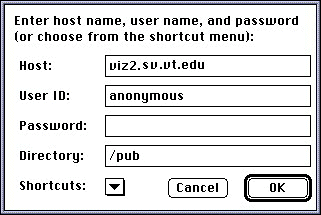
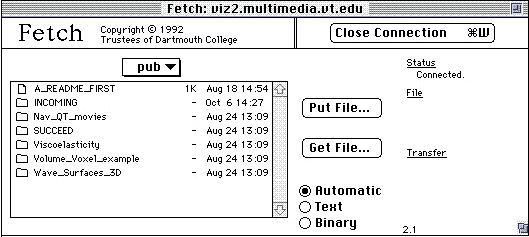
- You must next supply the required information in all of the fields, except the directory field, which you can leave blank. Press the 'tab' key to move between fields. Leaving the directory field blank will put you in your home directory. When you type your password, it will not appear on the screen, but you will see a bullet series. After all of the fields are filled in, press the 'return' key and the screen below will become active. At this point, you can begin to select the appropriate directory that you wish to be in and get or put files automatically. The program can usually determine the correct mode of file transfer, but it does give you a chance to change the mode if you need to. When you are finished, click on the close connection box and quit Fetch.
 Click image to return to Visualization home page.
R.D. Kriz
Virginia Tech
College of Engineering
Revised 01/10/99
http://www.sv.vt.edu/classes/ESM4714/exercises/exer4/exer4.html


